Streamline how you work by utilizing the following Join integrations with Procore:
1. Creating a Change Event in Procore
Link an accepted Item in Join to a Change Event in Procore, streamlining the coordination activities between preconstruction and operations. This allows Join to continue to be the decision-making platform of choice for project stakeholders later in the project lifecycle and eliminates duplicate data entry.
First, link to your Procore Account
- Expand the Integrations section of an Item
- Click the Add Account button
- Click the Sign in button next to Procore, which will redirect you to Procore
- Enter your Email and Password
- Click the Log In button, which will redirect you back to Join
- Click the + Connect a Project button
- Select a Procore Company and Procore Project to link to your Join Project
- Click the Update button

Now you're ready to create a Procore Change Event
- Expand the Integrations section of an Accepted Item
- Click the + Change Event button
- Fill out the fields in the Create Procore Change Event window
- Click the Create button

After creating the Procore Change Event, you will see it listed in the Integrations section of the Item in Join. In Procore, the Description will include a link to the source Item in Join. Both of these are hyperlinked to each other.


2. Import an Estimate from Procore Estimating
Read this article to learn how to import a Procore Estimating estimate into Join.
3. Adding attachments from Procore Documents
By leveraging your Procore Document workspace, Join ensures your team can access the latest construction documents.
Organize your construction documents by linking your Procore account with Join. You can link the folder housing your file in Procore to the respective Items and Milestones. This ensures you always have access to the most up-to-date version of each document, reduces the need to track multiple copies, and ultimately saves you time and effort.
First, link to your Procore Account
- Select the Add a file button either in the Milestone attachments or Item Attachments
- Select Link Accounts under the Cloud Storage section
- Select the Sign in to Procore button
- Enter your Email and Password
- Select the Log In button
Now you're ready to add your documents
- Select the Add a file button either in the Milestone attachments or Item Attachments
- Under Cloud Storage, select Procore
- Navigate the folder structure to the documents that you want to attach (only the Shared Documents folder can be accessible from Join)
- Select them by checking the box
on the left-hand side
- Select Add Files in the lower right corner
Caution: By linking the attachment through Procore, the visibility of the linked document will be subject to the permission set in both Join and Procore.
4. Adding Join to Procore as an Embedded App
Harness the power of Join's decision making platform from inside the Procore Platform
Installing the Join app
- Navigate to the Procore Marketplace and log in with your Procore credentials
- If prompted, select the company you want to log in to and click Continue
- Type Join into the search bar, click the Join Embedded App result

- On the Join app page, click Install App, in the top right
- On the install app modal, click Install
- Use the Create Configuration modal to create an initial App Configuration now, or skip this step and Create an App Configuration and Apply it to Projects later
Note: You'll need to have 'Admin' permissions to your Procore Directory to add the app
Creating a Join app configuration
- From within Procore, navigate to the company's Admin tool
- Under 'Administrative Settings', click App Management
- Locate the Join app you want to create a configuration for and click the associated View button
- Click the Configurations tab
- Click Create Configuration
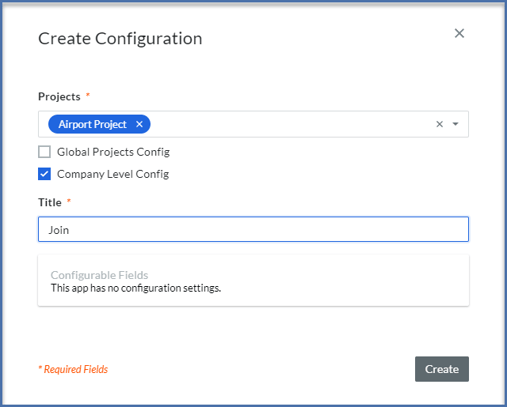
- Select one or more projects you want to add to the configuration, or select Global Projects Config to include all active and future projects
- Select the Company Level Config option. With this option enabled, users can launch the app from the company-level header in Procore
- Enter a Title for the new app configuration. App users will see this display name when using the 'Select an App' menu
- Click Create
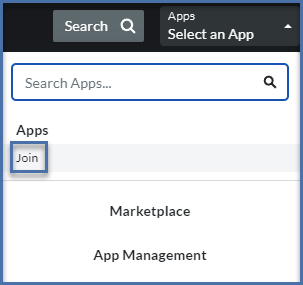
Accessing Join from within Procore
Once you've configured your app, you can access it via the Apps menu in the top right of all Procore screens. The title you defined during the configuration will be displayed in the Apps menu.
Note: If the app isn't displayed, you may need to create an App Configuration for the appropriate level (Global, Company, Project) within Procore.
Congratulations🎉, you can now access Join without leaving the Procore platform!