The Workspace is where you build out your project plan. All changes made in this view automatically appear in the Presentation view for your team to see. Use simple scheduling logic, such as predecessors and successors, to structure your project. Only users who have Admin permissions for Timeline will have access to the Workspace view.
Tip: Plan ahead with future Activities & Milestones. Add activities to keep your team aligned on progress toward delivery. Examples: Milestone: GMP, or Activity: OAC Meeting
Creating Activities
To create a new activity (Phases and Events) on your project, follow these steps:
- Navigate to the Timeline page and select the Workspace view
- Click the + New Activity button
- A new row is added at the bottom of your workspace list view
- Rename the New Activity.
- Fill out the following fields to schedule your activity:
- Duration - Duration of the activity in workdays
- Start Date - Start date of the activity
- End Date - End date of the activity (only applies to Phases)
- Predecessor - Select an activity that must finish before this task can start
- Successor - Select an activity that can’t start until this task finishes

Tip: Activities can also be added in-line by right-clicking on an Activity and selecting Add Above or Add Below.
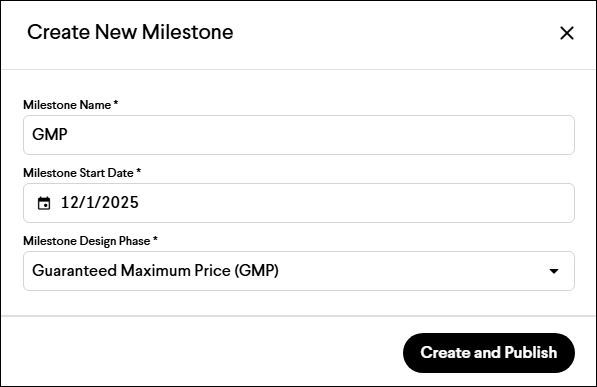
Creating Milestones
To create a new milestone on your project from the Timeline, follow these steps:
- Navigate to the Timeline page and select the Workspace view
- Click the + New Milestone button
- Fill out all of the required fields below
- Milestone Name - Name of the Milestone
- Milestone Start Date - Start date of the Milestone
- Milestone Design Phase - Select the corresponding design phase for the Milestone
- Click the Create and Publish button
Creating Parent Phases
To group a set of activities under the same heading, utilize the following functionality:
- Nesting & Unnesting - To create parent phases

- Drag & Drop Activities to reorder or nest them

Note: Parent phases will summarize the Start Date, End Date, and Duration of their children unless they are manually scheduled. Milestones cannot be Parent Phases.
Scheduling Activities and Defining Dependencies
Schedule Activities or Milestones just like a traditional project plan by establishing dependencies between them. Dependencies control how one activity’s timing affects another, and our platform supports all four standard relationship types:
- FS (Finish-to-Start) - Default / Most common
- FF (Finish-to-Finish) - Aligned completions
- SS (Start-to-Start) - Aligned starts
- SF (Start-to-Finish) - Least common
You can define relationships in two ways:
Option 1 - Table View (Predecessor & Successor Columns)
- Type the related line number followed by the relationship code, for example, L02SS. If no relationship code is provided, the system defaults to FS.
- Or, select an activity from the dropdown.
Option 2 - Gantt Chart (Drag & Connect)
- Hover over the start or end of an activity bar and drag to another activity.
- Connect the desired ends to define the relationship type.

Note: When a link is attempted that creates a scheduling cycle, the connection will not be created.
Manually Scheduled Activities
Manually Scheduled Activities are not affected by the automatic scheduling engine. Their start and end dates remain fixed unless you intentionally change them — they do not shift based on nested activities, dependencies, or scheduling logic.
This gives you full control when certain work shouldn’t follow traditional scheduling rules.
Note: If you have an existing project that utilizes Timeline, all of your existing Phases have been set to Manually Scheduled in Spring 2025.
Scheduling Cycles
If invalid dependencies are defined within the Workspace view, a “Scheduling Cycle” will be identified. To resolve the cycle, select a path that best suits your intended action.
Importing Schedules
Importing or syncing a Timeline in Join from a schedule created in Oracle Primavera P6, Microsoft Project, or other scheduling software is not currently supported.