Early Access Feature
This feature is currently available only to customers enrolled in our Early Access program. If you are not part of the Early Access cohort, you will not see this feature in your account yet.
Importing a schedule is one of the first steps when setting up a new project in Join. This process helps establish your Project Timeline so you can begin planning milestones, estimates and decisions with accurate, up-to-date information aligned with your master schedule.
The import process includes two phases:
- Export your schedule data
Join supports two schedule export formats:
-
- Microsoft Project - export your schedule as an .XML file
- Oracle Primavera Cloud or P6 - export your schedule as an .XER file
- Other tools - if available, export your schedule as a P6 .XER file from tools like Phoenix Project Manager, Planera, etc.
Tip: Before exporting, make sure your schedule is current. Join preserves the task names, dates and structure exactly as they appear in your scheduling tool. All imported activities will be read-only in Join.
-
- Navigate to the Timeline Module.
- Enable Editing of Timeline.
- Click the
 icon in the top right and select the file you'd like to import (Using one of the files generated in step 1 above).
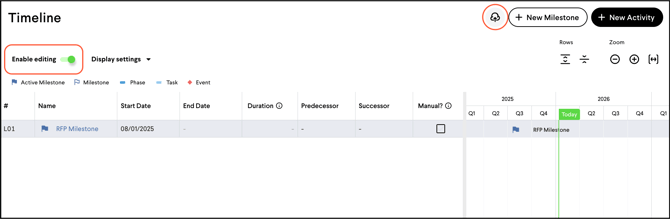
Tip: Join Milestones (Estimates and Budgets) still need to be created in Join. This can be done from within Timeline or in the Milestones tab.
Need to undo an import?
No problem, you can quickly bulk delete activities.
Use Shift + Click or Ctrl + Click to select multiple activities, then click Delete selected in the bottom action bar. Confirm by clicking Delete in the modal.

Updating Timeline when your Schedule Changes
When your schedule changes, follow the same process above to update your Timeline. Join will automatically match UID between the files to ensure existing activities are updated and new activities are created appropriately.
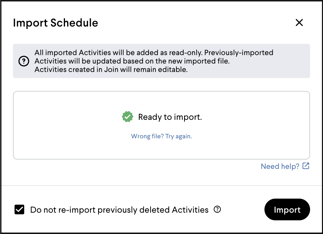
Select the "Do not re-import previously deleted Activities" option if you'd like to ignore select activities or a section of your master schedule file. For example, if you choose to bring in a summary of Construction Activities until the details are further developed, Join will remember the activities previously deleted upon reimport.
Next Step: Once your schedule is in Join, it is time to build out your first Milestone with an Estimate and Budget and add some items!
Exporting from Microsoft Project
-
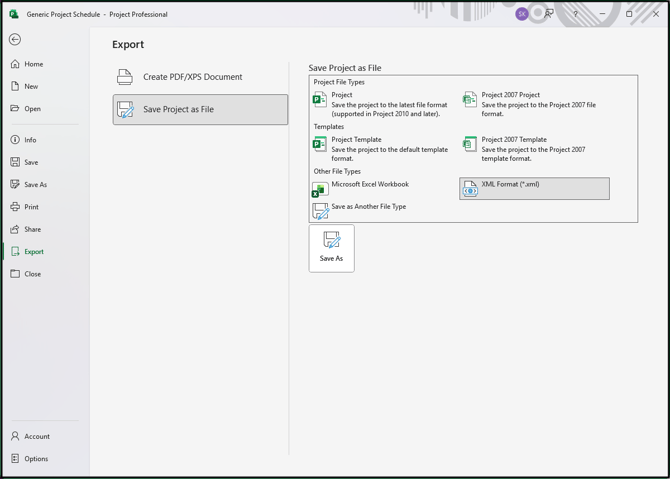
Open your project in Microsoft Project Professional.
-
Click the File menu and select Export.
-
Click Save Project as File to choose a folder location.
-
In the Save Project as File list, select XML Format (*.xml).
-
Click Save As and then Enter a file name / location to save it to your computer.
Exporting from Oracle Primavera Cloud or P6
- From the Project List in Oracle Primavera Cloud, right-click on your project and select "Export to P6".
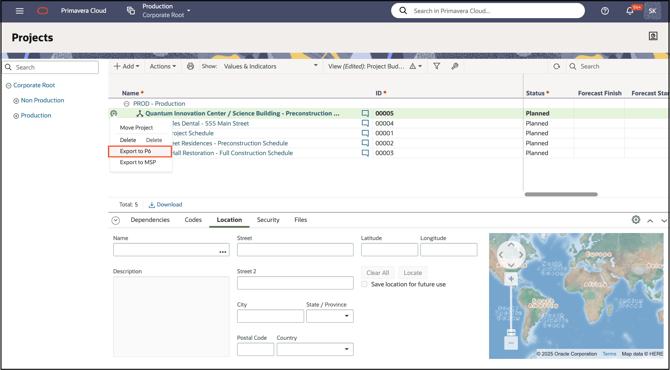
- Select XER as the file format, and click Export.
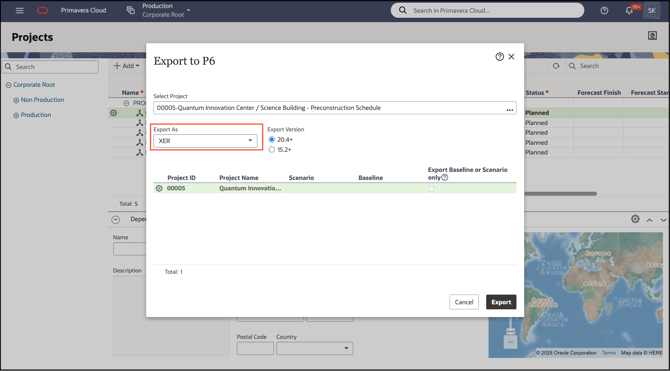
- When the file is ready, download to your computer.